

Stripe accountsetup, Canada.
Step by step, with screenshots from a real Stripe Dashboard: open the account, pass verification and get payouts to your bank. At the end, what to send us so payments work on your website.
Checked against Stripe documentation on November 3, 2026.
- Domestic Canadian cards
- 2.9% + C$0.30
- Verification review
- usually 3–5 business days
- First payout
- after 7 days
- Sandbox
- right after signup
Country first
Canada
supportedSupported. You need a business in Canada, a physical Canadian address (Stripe does not accept a P.O. box) and a Canadian bank account. Payouts in CAD; a USD account at a Canadian bank works too.
United States
supportedSupported. A non-resident can form a US LLC or corporation and open Stripe on it, with a US address and bank account.
Ukraine, Russia, Belarus
noNot on Stripe's country list. Stripe states that it does not support users located in Russia, Ukraine and Belarus, and Canadian accounts may not accept payments from Russia. For founders from Ukraine we look at a US or Canadian company case by case; sanctions workarounds we do not do.
Forming a US company for Stripe is one of our services: LLC or corporation, EIN, bank account. Form a US company →
Have these ready
- 01
Business type
For Canada Stripe offers individual or sole proprietorship, corporation, partnership, registered charity and non-profit. Pick the one your bank account is opened for.
- 02
Company numbers
For a corporation Stripe asks for the corporation number (7 digits) or Registry ID, in Québec the NEQ. Keep your CRA Business Number (BN) close: you add your GST/HST registration with it.
- 03
Address and phone
A physical business address in Canada and a support phone number your customers will see.
- 04
Owner's ID
Photo ID: verification uses a picture of the document and a selfie. If the representative lives in another country, Stripe accepts a passport only. Proof of address may be requested.
- 05
Owners and directors
Name, date of birth and address of everyone who owns 25% or more. For a corporation, the directors as well.
- 06
Website and description
Your website address, industry and a sentence or two on what you sell: product, service, subscription.
- 07
Bank account
Transit (5 digits), institution (3 digits) and account number — on a void cheque or in online banking.
- 08
Two-step login
An authenticator app, a passkey or a security key.
Seven steps
- Step 01
Create the account
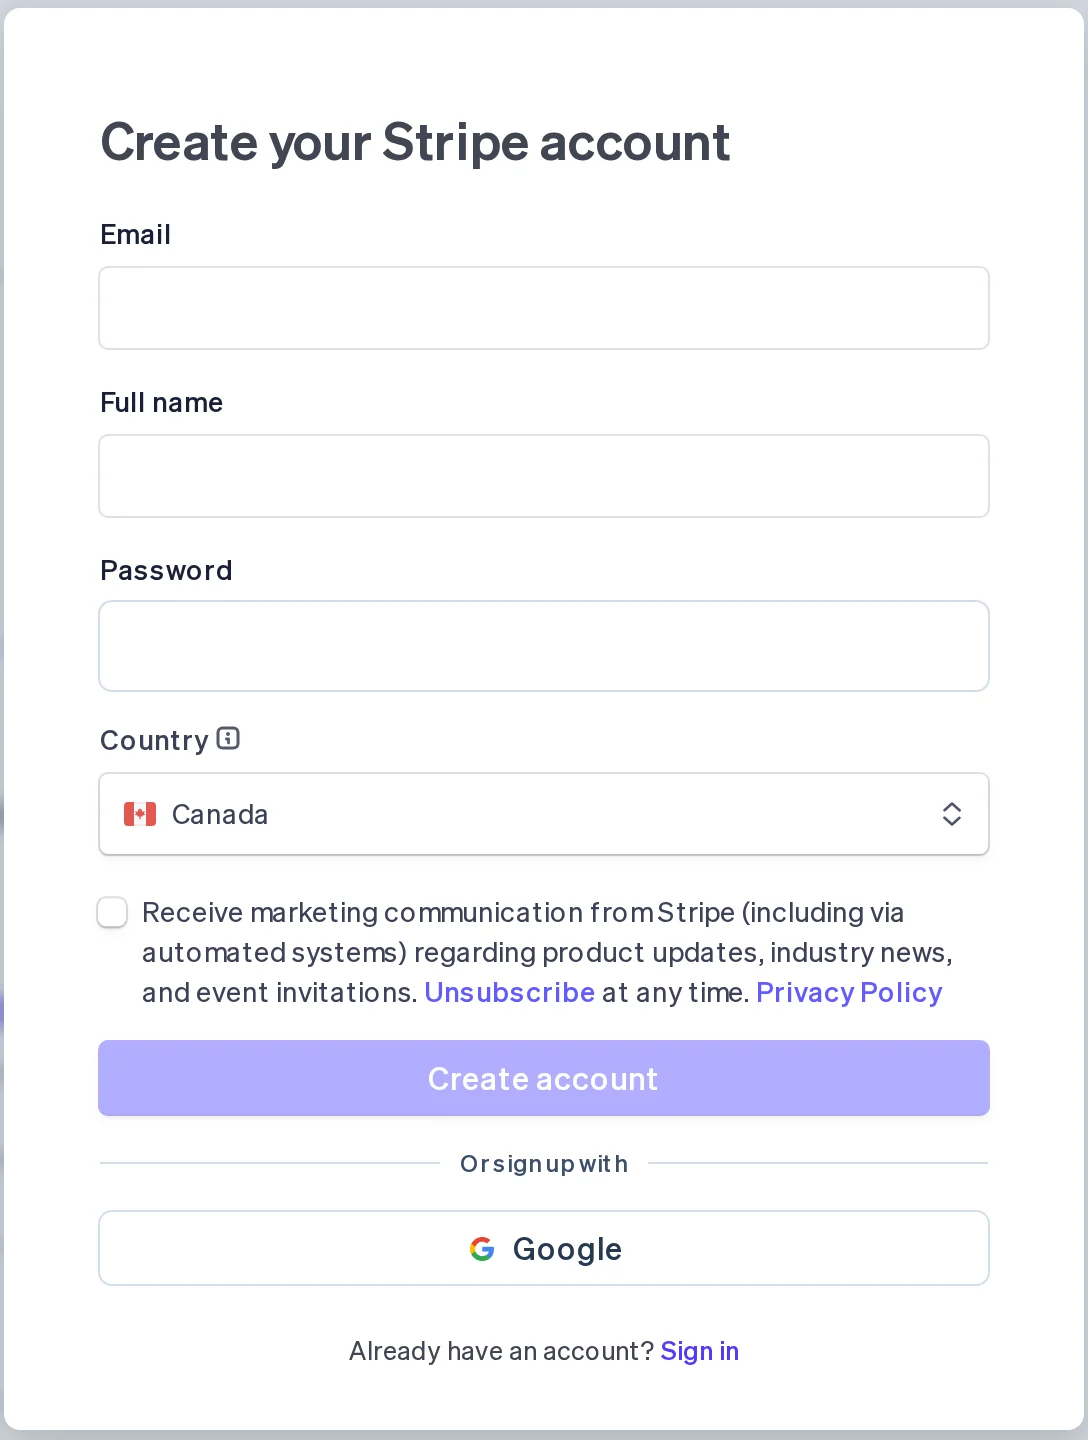
Open Stripe's signup page. Enter a work email, full name, password and country — Canada. Google sign-up works too.
The Dashboard opens with a sandbox right away: you can test payments there, no real money moves.
Sign up for Stripe - Step 02
Verify your email
Click Verify your email in the Dashboard and open the link in Stripe's email. Then move on to activation.
- Step 03
Activate payments
Click Activate payments or the item in the Setup guide. Stripe walks you through business type, tax details, business details, personal verification, customer-facing information, payout bank and two-step authentication, then Agree and submit.
Review status and any tasks Stripe sends you live in Settings → Business → Account status.
- Step 04
Business and customer-facing details
Website, legal and public business name, address, support phone, industry and product description.
Here you also set the statement descriptor, the text on your customer's card statement: 5–22 characters, at least 5 letters, none of < > ' ". Use a name your customers recognise.
- Step 05
Identity verification
The representative enters name, date of birth, address, phone, email and title, then photographs their ID and takes a selfie. Owners of 25% or more and directors are added the same way.
Review usually takes 3–5 business days. If Stripe needs a document, a task appears in Account status and you get an email.
- Step 06
Payout bank account
Add a Canadian account: transit, institution and account number. Payouts are in CAD; a USD account at a Canadian bank works too.
The first payout arrives after 7 days, then on schedule, usually 3 business days. Change the schedule in Settings → Linked accounts and payouts.
- Step 07
Two-step authentication
Turn on 2FA for yourself and require it for the whole team: Settings → Team and security → Two-step authentication. Stripe prefers passkeys or security keys; an authenticator app works too.
Handover without passwords
Keep your Stripe login and password to yourself: Stripe asks you never to share them, developers included. An invitation to your team and a few answers are all we need.
- → 01
Invite us to your team
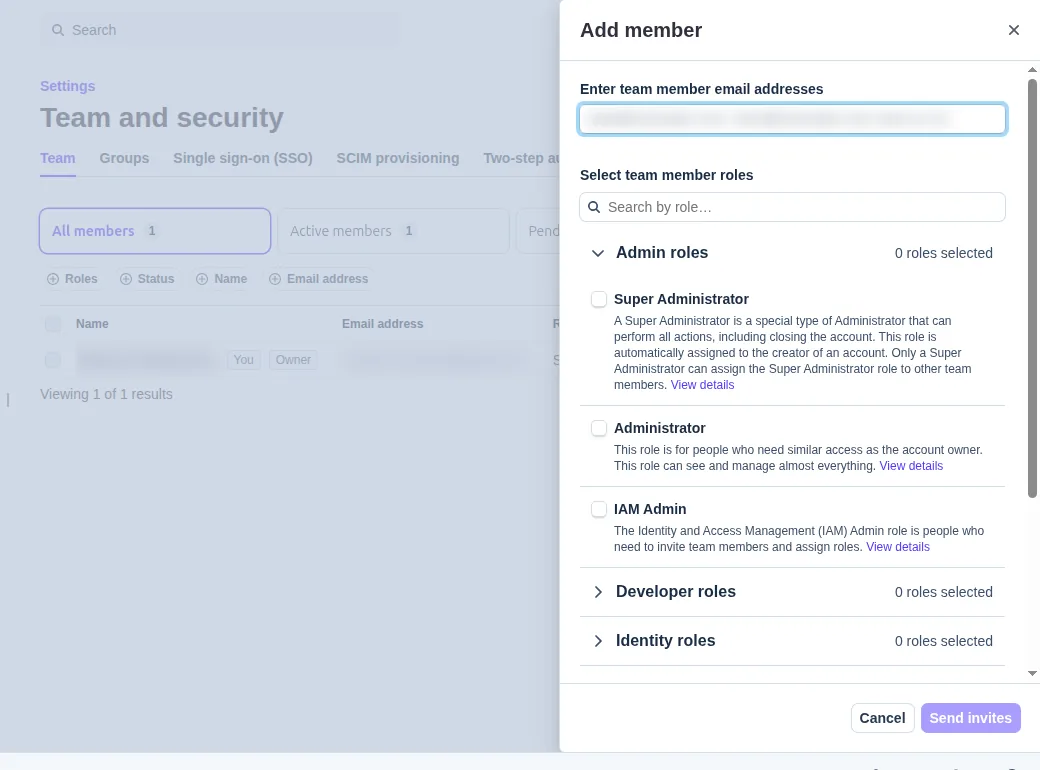
Settings → Team and security → Add member. We send the address to invite with our reply to your request.
Choose the Developer role: it creates and views API keys, sees events and logs and edits almost all product settings, while bank details, payouts and team members stay out of its reach. If you want us to set up everything, taxes and branding included, choose Administrator. The invitation is valid for 10 days.
- → 02
No access? A restricted key
Developers → API keys → Create secret key. Stripe recommends a restricted key (rk_) with the least permissions — we send you the list for your project.
In live mode Stripe shows a new key once. Send it through a one-time encrypted link such as Bitwarden Send, never as plain text in email or chat. The publishable key (pk_) is not a secret.
- → 03
We set up the webhook
We create the endpoint for payment events ourselves. Stripe issues a signing secret (whsec_) for each endpoint to whoever creates it, so there is nothing for you to forward.
- → 04
Products, prices, currency
A list with name, price, currency (CAD or USD), one-time or subscription, and whether tax is included. Add them to the Product catalogue yourself or send a spreadsheet.
- → 05
Tax: HST and Stripe Tax
If you are registered for GST/HST — required once sales pass C$30,000 over 12 months — add the registration in Settings → Tax. Ontario HST is 13%.
Stripe Tax calculates the tax for 0.5% per transaction in Checkout and Payment Links. If you skip Stripe Tax, tell us which rate to apply.
- → 06
Checkout branding
Settings → Business → Branding: icon, logo, brand and accent colour. Send the logo as SVG or PNG and your colours, and we set it up.
A custom checkout address such as pay.yoursite.ca is a paid Stripe option at US$10 per month.
- → 07
Apple Pay and Google Pay domains
Settings → Payments → Payment method domains → Add a new domain. Needed when the payment form sits on your own site; no Apple Merchant ID required. Tell us the domains that will take payments and we add them.
- → 08
Policies and contacts
Links to your terms, refund and privacy policies, plus support email and phone. They go into Public details and show on the checkout page and Stripe receipts.
What Stripe charges
- Domestic Canadian cards
- 2.9% + C$0.30
- International cards
- +0.8%
- Currency conversion
- +2%
- Stripe Tax in Checkout and Payment Links
- 0.5% per transaction
- Custom checkout domain
- US$10 per month
- Stripe Atlas — a US company
- US$500 once, then US$100 per year
Stripe's prices as of November 3, 2026. These are Stripe's fees; our integration work is quoted separately.
Common questions
How long does Stripe account setup take in Canada?
The account itself takes a few minutes and you can test in the sandbox the same day. Verification usually takes 3–5 business days, and the first payout arrives after 7 days.
Do I need a Business Number (BN) for Stripe?
For a corporation Stripe asks for the corporation number or Registry ID, in Québec the NEQ. Your CRA Business Number is what you use to add a GST/HST registration in Stripe Tax.
Can I use a USD bank account?
Yes. Stripe accounts opened in Canada can pay out to USD-denominated bank accounts.
Should I give my developer my Stripe password?
No. Invite them to your team with the Developer role, or send a restricted key through a one-time encrypted link.
Can a non-resident open a Stripe account in Canada?
Stripe requires a business registered in Canada, a physical Canadian address and a Canadian bank account. A representative living abroad verifies with a passport.
What is a Stripe sandbox?
A test environment with its own keys and test cards. You check the payment flow on your site before launch, and no money moves.
Account ready? We connect payments
Invite us to your Stripe team and send the list of products and prices. We connect Checkout or an on-site payment form, set up the webhook, tax and branding, and run a test payment in the sandbox.